This guide will help your recover corrupted, unplayable or accidentally deleted MP4 video files.
Key Specs:
- Tool: Restore.Media
- Video file format: MP4
- Supported cameras: all digital cameras, DSLRs, drones, smartphones (Android, iPhone), dash cams, action cameras and screen recording apps.
Restore.Media is an MP4 video recovery tool that works online, right in your web browser. So, there is no need to download and install anything.
The tool has recovery algorithms optimized for hundreds of different camera models. This increases the likelihood of recovering damaged MP4 video. Restore.Media also supports H.264 / AVC and H.265 / HEVC compression codecs.
Follow the steps below to recover MP4 video quickly. Select your case from the list to jump directly to the relevant section:
- I cannot play MP4 video file in my media player. The file appears to be damaged – see this chapter.
- I accidentally deleted MP4 files from SD card or other storage device – go here.
- I'm 100% sure the MP4 files are ok, but my media player won't play videos – see this chapter.
- How can I prevent future damage to my videos? See this section.
Chapter 1:
How to Fix Corrupted MP4 Files with Restore.Media
MP4 files are media containers that consist of video streams, audio streams, and metadata.
Broken MP4 files usually contain good video and audio streams, but have corrupted structure and metadata (we'll cover this in more detail later in this article).
Restore.Media is a video recovery tool that extracts healthy video and audio streams from damaged MP4 file, recovers metadata and then embeds it into a new playable MP4 file.
Here is a step by step guide to fix corrupted MP4 files with this tool:
Step 1
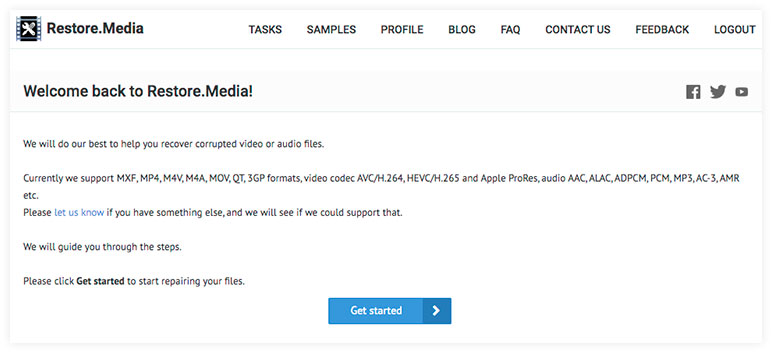
Register a free account at Restore.Media
Registration is free and you can also repair / preview videos for free. However, please note that you have to pay a small fee to download the recovered MP4 video.
Step 2
When you're signed in, click Get started:
Step 3
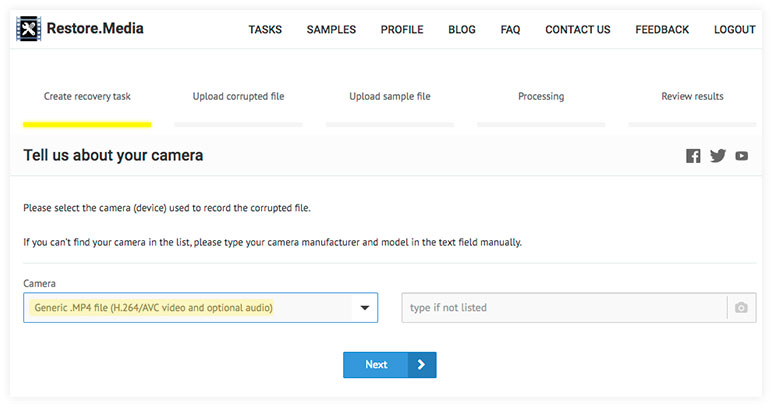
Now select the camera used to record the corrupted MP4 video file.
If you cannot find the camera in the list, just enter it manually in the text field.
And if you don't know which camera was used to record the video, select Generic MP4 file (H.264/AVC video and optional audio):
Step 4
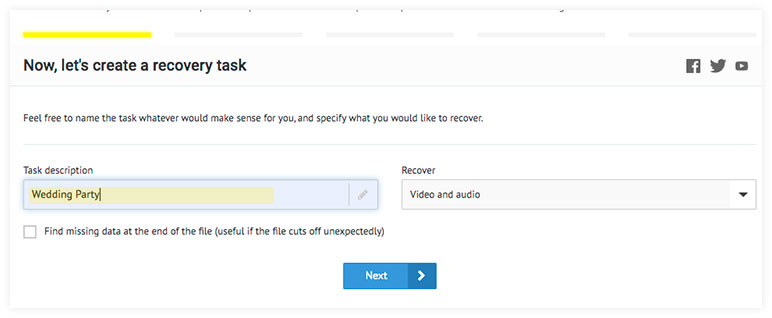
Create a recovery task by giving it whatever name you like. For example, "Wedding party" or "Summer vacation":
Step 5
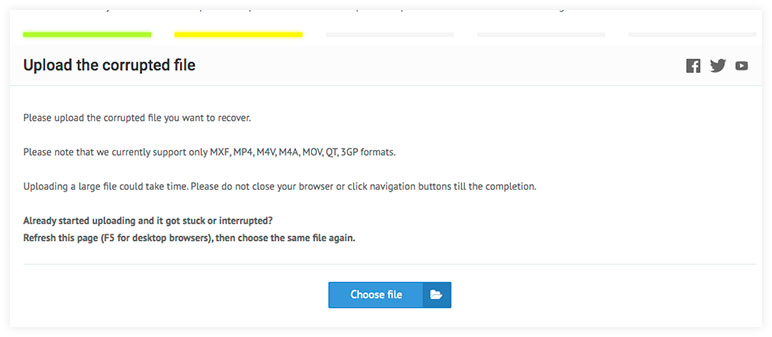
Now click Choose file to upload corrupted MP4 video:
Step 6
At this point, Restore.Media may ask you to upload a sample file. In this case, you will see the following screen:
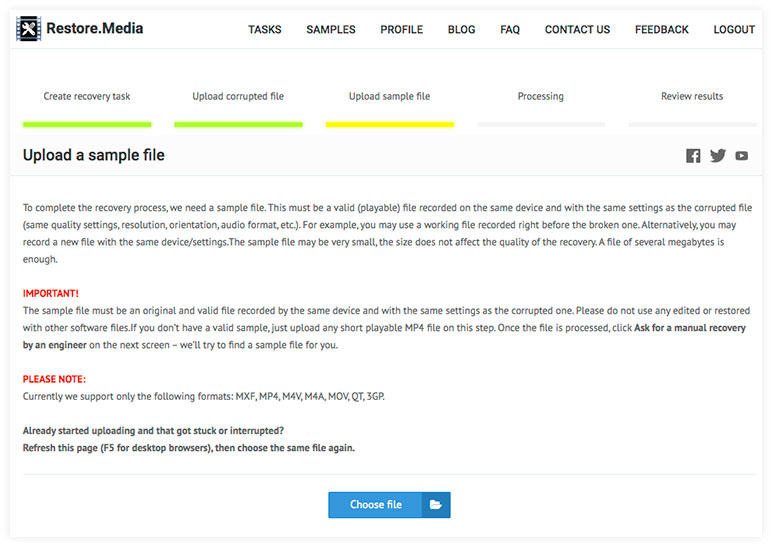
A sample video is a non-broken (playable) video file recorded with the same camera and with the same settings as the damaged file (same resolution, orientation, frame rate, etc.).
As a sample file, you can use a video that was recorded by the camera just before the damaged file. Alternatively, you can try to find a sample file in your video archive or even record a new one. A video sample of 30 seconds or more should be sufficient.
Again, the key point here is that the sample video must be recorded with the same camera and with the same settings as the damaged video. Restore.Media will use data from the sample video to fix your corrupted MP4 file.
Note: Sometimes you don't need a sample video to recover a damaged MP4 file. It depends on the camera model used to record the corrupted MP4 video. If so, just go to Step 7.
Step 7
Restore.Media will start repairing the corrupted MP4 file automatically. The time it takes to fix the damaged video depends on the file size.
Upon completion, you will see several screenshots taken from the recovered video, as well as a full-length video preview.
Screenshots are taken in the original video resolution. Whereas the video preview is in low resolution and quality for informational purposes only, so that you can check if the video has actually been restored:
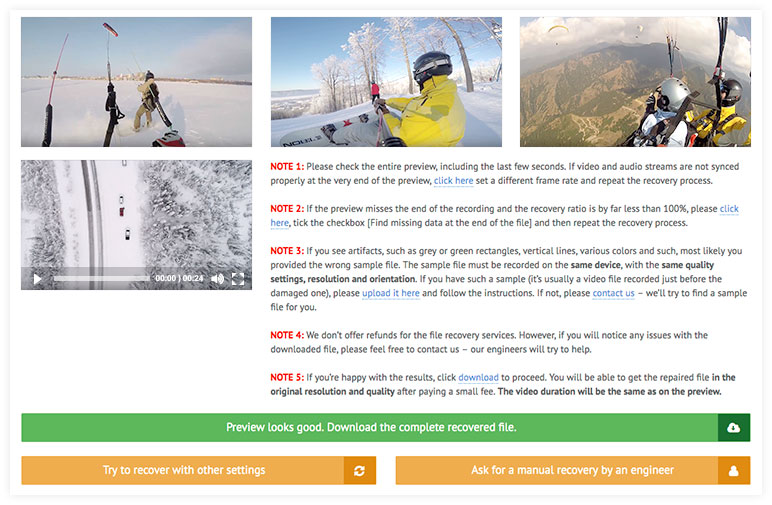
If you are satisfied with the results, click the big green button at the bottom of the page to download the recovered MP4 file in its original resolution and quality.
If the video has not been repaired properly, read the notifications displayed next to the preview to try to repair the file with different settings.
Note: If you've tried other settings, but your broken MP4 video still hasn't been fixed, feel free to send us the file for manual recovery. Just click on the big yellow button "Ask for manual recovery by an engineer" (see screenshot above). Or send us a message via email.
Method 2 – Use Our Command Line MP4 Recovery Tool
This method of recovering corrupted MP4 files only works on Windows systems. It also requires some basic knowledge of the Command Prompt.
If you are using any other operating system (for example, macOS, iOS, Android, etc.), or if you are not familiar with Command Prompt, we recommend repairing videos using Restore.Media.
Step 1
Make a backup of your damaged MP4 video.
Step 2
Find a sample MP4 file. It must be a healthy (playable) video file recorded with the same camera and with the same settings as the damaged file (same resolution, orientation, frame rate, etc.).
If you are using a valuable video as a sample file, make a backup copy of that video as well.
Step 3
Download our Command Prompt MP4 recovery tool by clicking on this link.
Step 4
Download another free tool called FFmpeg. You will need it later to combine the fixed video and audio streams into the final MP4 file. You can download FFmpeg here.
Step 5
At this point, you should have two zip archives downloaded to your computer. Now unzip the ffmpeg.zip file to your C:\ drive. Rename the extracted folder to ffmpeg.
Step 6
Inside the ffmpeg folder is the bin directory. Open this directory and unzip all files from recovery_MP4.zip into it. After that, all .exe files from both archives should be stored in the /ffmpeg/bin folder.
Step 7
Rename the damaged MP4 file to "bad.mp4" (without quotes).
Rename the sample video file to "good.mp4" (without quotes).
Then copy the files bad.mp4 and good.mp4 to the \ffmpeg\bin folder.
Step 8
Now you need to run Command Prompt as administrator. To do this, click Start and type CMD in the search box. A command line invocation link should appear. Right click it and select "Run as administrator". This will open the Command Prompt in a new window.
Step 9
In Command Prompt, change the working directory to the one where the ffmpeg.exe, Recovery_mp4.exe and MP4 files are stored.
For example, if you extracted all the files to the C:\ drive as described in the previous steps, the working directory should be: C:\ffmpeg\bin
To switch to this directory, enter the following command in the Command Prompt:
cd C:\ffmpeg\bin
Step 10
Copy the following command to Command Prompt and press Enter:
recover_mp4.exe good.mp4 --analyze
What will this command do?
- recover_mp4.exe – launches (calls) the video recovery application
- good.mp4 – specifies the path to the sample video required for the recovery application
- --analyze – instructs the tool to extract the required data from the sample file
Step 11
After processing is complete, you will receive a message containing two commands. The first is to fix the missing metadata. And the second is to embed the recovered video and audio streams into the final MP4 file.
At this point, we recommend that you copy the second command into a text document so you can run it later.
Now run the first command in Command Prompt (just copy / paste it and press Enter). The command should look like this:
recover_mp4.exe bad.mp4 recovered.h264 recovered.aac
What will this command do?
- recover_mp4.exe – launches (calls) the video recovery application
- bad.mp4 – specifies the path to the damaged MP4 file
- recovered.h264 – specifies the output file name for the fixed video stream
- recovered.aac – specifies the output file name for the fixed audio stream
Step 12
Now you need to combine the received video and audio streams into the final valid MP4 file. To do this, run the command that you previously saved in a text document. The command should look like this:
ffmpeg.exe -r 30 -i recovered.h264 -i recovered.aac -bsf:a aac_adtstoasc -c:v copy -c:a copy recovered.mp4
This command will call the FFmpeg tool to merge streams. The final MP4 file will be saved in the same folder (C:\ffmpeg\bin) called recovered.mp4.
Your MP4 video is now fixed! You can play it in your favorite media player.
Please note that the commands above may differ depending on the paths you used to extract FFmpeg and MP4 recovery tool. So, be sure to follow the instructions from the Command Prompt.
Also note that we do not provide support for the free tool recover_MP4.
If you are stuck with Command Prompt and cannot recover corrupted MP4 video files for any reason, we recommend that you try Restore.Media instead. It has a wizard-like interface and is much easier to use.
Update: We recently came across this video tutorial on how to use the recovery_MP4 tool. It was created by a video blogger who was able to recover MP4 files using the tool:
Chapter 2:
How to Recover Deleted MP4 Video Files
In this section, we will try to help those of you who have:
- Accidentally deleted MP4 files from SD or other flash memory card.
- Accidentally formatted a memory card with MP4 files stored on it.
The chance of successful video recovery in these cases depends on how fragmented your MP4 files are, and whether you have overwritten the deleted files.
Note: If you've deleted MP4 files from your hard drive (HDD), the chances of recovering them are unfortunately low. And it is almost certainly impossible to recover deleted video files from an SSD drive. This chapter will be useful mainly for those who have deleted their MP4 files from a flash memory card such as SD or microSD.
The Problem
Fragmentation of files occurs due to the way most file systems work. Each storage device, be it a flash memory card or hard drive, is divided into small blocks. When a file is written to storage, the file system splits the file into small chunks that are placed in blocks.
However, blocks of free space are not always aligned continuously. This is a fairly common case where blocks of free space are in between some other files that you have previously written to the storage medium. So, when you save (write) some new video to a storage device, its file system fills all those free space gaps with a new file.
As a result, chunks of your MP4 video file may be scattered across the storage. Sometimes there can be hundreds or even thousands of file fragments, depending on how fragmented the storage is.
Now, when you delete a file or do a quick format, the file system does not actually erase the file, but rather deletes the indices that indicate where all the chunks of that particular file are in storage.
To recover such a fragmented MP4 video file, one would need to analyze the whole storage medium to collect all the file's chunks and then combine them frame by frame into a single video file.
Pro tip: Quickly format your memory card before shooting important footage. This ensures that no unnecessary data is left on the card, and new video files are written into contiguous blocks of free space, rather than scattered around the storage.
So far, we are not aware of any software that could accurately recover such fragmented video files. But there is still a solution:
Solution
Step 1
If you accidentally deleted an MP4 file or quick-formatted your memory card, the first thing you should do is remove the memory card from the camera and lock it to prevent new data from being written to the card.
Remember – the less manipulations you do on the memory card, the higher the chances of recovering your MP4 files.
Step 2
Now create an image of the entire memory card. Please note that the image type must be IMG, not ISO.
Step 3
Upload the image file to a file sharing service like Google Drive and email us the link to it. Our video engineers will analyze the image of your memory card and try to recover the video files for you.
Update: We have recently published a much more detailed guide to the process of recovering video from SD card. We strongly recommend that you read the guide if you accidentally deleted your video files and want to recover them.
Chapter 3:
Check Your Media Player and Video Codecs
In this chapter, we give advice on what to do when the MP4 file does not play, even if you are sure that the video is not corrupted in any way.
Video data contained in MP4 files can be compressed using various codecs.
Some codecs are common and come preinstalled with built-in software such as Windows Media Player, QuickTime, or the default Android media player. Other codecs are rare, which means you may need to install additional software to be able to play the file.
For example, you might have downloaded an MP4 file from a trusted source, from a website, or someone just shared a video with you. The file is fine, but when you try to play it, you get an error message such as "unsupported file format", "file cannot be played", or the like.
If this is your case, most likely you just have an outdated media player or the required video codecs are not installed on your computer.
For Windows users, we recommend the latest K-Lite Codec Pack. This free package includes all the major codecs you need to play a wide variety of media types, including MP4. It also comes with a lightweight media player called Media Player Classic (MPC), which is a great replacement for the built-in Windows Media Player. In some cases, it even lets you play corrupted MP4 files with broken indices.
Please note: after installing the K-Lite Codec Pack, it is not recommended to install any other codecs on the same computer in order to avoid possible conflicts between them.
For Mac and other non-Windows users, we recommend VLC media player. It's free and works on all popular platforms including Mac, Linux, Android and iOS. VLC media player also comes with video and audio codecs including AVC / H.264 and HEVC / H.265 required to play MP4 video files.
If you've installed the latest K-Lite Codec Pack or VLC media player and the video still won't play, it might be because the MP4 file is actually corrupted.
Sometimes the video plays, but it contains glitches / artifacts or extraneous noise. These are also signs of a corrupted video file that you can potentially fix.
See Chapter 1 to learn how to recover MP4 video files.
Chapter 4:
How Can I Prevent Damage to MP4 Recordings?
To answer that question, let's first take a closer look at what MP4 files actually are.
MP4 (or MPEG-4 Part 14) is a multimedia container format used to store video and audio data.
In addition to the actual video and audio tracks, each MP4 file contains the metadata required by media players to open the file. This is information about video length, resolution, frame rate, bit rate, codecs, etc. Metadata is stored in a separate section of each MP4 file – the header.
When recording video, each camera stores metadata in internal memory (RAM), and the actual video is recorded in permanent storage (usually an external memory card such as SD).
RAM (random access memory) is temporary memory required for fast operation of cameras. When you stop recording video, your camera transfers metadata from RAM to permanent storage and saves it at the end of the recorded MP4 file.
Unfortunately, RAM cannot store data without power. As you may have guessed by now, if the camera accidentally turns off while recording a video, the metadata may be lost and will not be saved in the final video file. As a result, you have an MP4 file that looks like a regular video, but won't play.
The same problem can occur due to a file transfer failure. If the video download is interrupted, the necessary metadata may be lost. As a result, this video will not play.
Basically, if you didn't stop video recording properly, or the transfer process of the video file was interrupted for any reason, you may end up with a corrupted, unplayable MP4 file.
How to avoid this?
- First, be sure to press the STOP button BEFORE turning off the camera.
- Charge the camera's battery whenever possible. Be sure to bring backup batteries when shooting important videos.
- Quick-format the SD card in the camera after downloading files from it. This will prevent file fragmentation when new videos are written to the card.
- Remember to update your camera firmware on a regular basis.
- Back up important video files before editing or transferring them.
By following these simple tips, you will greatly reduce the chances of corrupting your MP4 files in most cases.
However, there are times when a disaster simply cannot be avoided. A dropped camera or phone, a hard landing and a drone crash are just a few examples of how video recording can be interrupted by an accident.
The good news is that it is still possible to recover corrupted MP4 files that have not been saved properly.
This is what Restore.Media does automatically for you. The tool recovers missing metadata, rebuilds corrupted indexes, and ultimately rebuilds the video file from scratch. See Chapter 1 of this article to learn how to recover MP4 files using this tool.
___________
We hope this guide can help you fix corrupted MP4 video files. If not, send us a message and our engineers will try to fix the files for you.
Happy recovering!